Pages

Ladies, if you haven't heard about environmental friendly reusable menstrual products, please read posts on Cloth pads & cups...

Monday, November 29, 2010

DIY Cloth Pad - Part 8 (Imported Flannel)

I meant to give cloth pads to a friend to try out..  have been dragging my feet and finally I completed 2 panty liners for her this morning.

There are 3 layers of flannel inside with additional 2 layers of flannel in the centre with a layer of hidden PUL (single layer PUL, not sandwiched).  I think it will be good for light flow too...

The one on the top is made from Imported Flannel I just bought from (R22 per meter):


The flannel is thicker than the ones I bought from Nagoya.   Harga kan tak sama.. :)


2 other imported flannel from the same place.

http://maymayshop.blogspot.com/2010/11/cf-367-imported-cotton-flannel-cup.html
http://maymayshop.blogspot.com/2010/11/cf-365-imported-cotton-flannel-school.html


The niceclothdiaper site has left me (and cloth pad users) a comment:

"hi Anic and all,
We are clearing our PUL fabric here: http://www.niceclothdiaper.com/diaper-fabric/sandwich-pul-outer-layer.php . Check us out while stock last! Thanks. :)
love, http://www.NiceClothDiaper.com"

Check out their website:

For more information about cloth pads,  please see my other cloth pads entries:
http://anic-lohas.blogspot.com/search/label/Reusable%20Menstrual%20Products

Bye..
Anic


Sunday, November 28, 2010

Repairing my torn pants...

Hi all,

No craft work this week..  Only repairing my torn pants.

A pair of pants I have for probably more than 5 year?  Can't remember exactly..

Went through my stash and found a piece of linen cotton with the closest colour to the pants.

Cut two pieces of same size, folded  the seam inside and ironed, then ironed them on top and below the torn part using iron on fabric double sided tape.   I then machine sewed the 4 sides using zigzag stitch. Happy with the outcome and hopefully it will last a couple more years...

it is upside down.. :)  i took the picture myself while i was wearing it.. that is why.. hehe.. :)

Found this useful link giving tips on how to patch a pair of pants:
http://www.practicalmanliness.com/how-to-successfully-patch-your-pants-in-7-steps/

Bye now and have a wonderful week ahead.

Warmest regards,
Anic

Tuesday, November 23, 2010

Bag Project 4 - Hexagon Patchwork Bag (Completed)

Finally...  I have completed the hexagon patchwork bag.   :)  I don't think I will start another project like this anytime soon. Taking too much time...   :)  

Previous posts about this project here & here.


I have inserted purse feet for the bag, see this useful link to learn how:


The look of inside (inside out before turning).   The "Boxy Bag" tutorial has provided great help in attaching the lining.


Made quite a few mistakes along the way...   My thread unpicking technique has improved.. :)   See below to learn a few tricks:


Material used:
1) Fabrics
This is a project I bought from  Emma's handmade.  The outer fabric came with the project however I didn't used the lining fabric provided as it is blue.  I didn't think that it will go well with the outer fabric, hence I used  Japanese fabric "Alice's In The Wonderland" from stock clearance corner of May May Shop instead.

2) PU leather handle, rivet and purse feet
These are bought online from China website.
Rivet is also available from My handmade Station


I found these useful links which help in bag making :

1)  Attaching leather handle (The one above is PU and not real leather. I prefer not to use leather...)
http://u-handbag.typepad.com/uhandblog/2010/06/how-to-attach-leather-straps-to-your-handmade-bags.html?utm_source=feedburner&utm_medium=feed&utm_campaign=Feed:+U-handblog+(U-handblog)

2) How to set a double cap rivet?
http://www.howtohistory.com/2010/06/how-to-set-a-double-cap-or-jiffy-rivet/

3) How to sew curved corner?
http://u-handbag.typepad.com/uhandblog/2007/04/one_of_the_medi.html?utm_source=feedburner&utm_medium=feed&utm_campaign=Feed:+U-handblog+(U-handblog)

5) How to press purse & bag?
http://nicolemdesign.blogspot.com/2008/10/pressing-matter.html
I used thick canvas bought from Nagoya (1 meter about RM10.50).  In the old days,  my mom used this too for ironing and I was happy to see it at Nagoya.  :)

6) Sewing the zipper pocket
http://elily00.wordpress.com/tutorials/wallet/

Bye now,
Anic

Monday, November 22, 2010

Bag Project 4 - Hexagon Patchwork Bag (2)

My hexagon patchwork bag still work in progress...

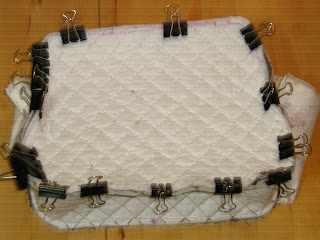
Finally, I reached the stage of sewing the pieces together to form a bag.  The material is quite thick, so I seek the help of binder clips...  :)  


Hopefully in a day or two, I will be able to complete the bag...

Have a good week ahead,
Anic

Wednesday, November 17, 2010

Bag Project 6 - Lunch Bag 2

Selamat Hari Raya Korban to Muslim friends.

Finally I could do some sewing today..  I sewed another lunch bag. This is for a friend.  


Same design as the previous one made but it is slightly smaller size.  Didn't add seam allowance properly. :(   As before, it is based on Lunch Bag Tutorial by Pink Penguin.  

Materials used:
1) The strap is from:

2) Linen cotton for external from:

3) Waterproof material for lining (didn't manage to take good picture to show how it looks like inside) but the material is like this:
The material is quite thick and hard.

4) Stabilizer
I used the thickest stabilizer I have, a meter RM8.5, bought at PJ Old Town.   It is like kain keras (use for man shirt's collar) but there is glue to iron on to the fabric.


Bye now....
Anic

Friday, October 29, 2010

Bag Project 5 - Lunch Bag

I need a lunch bag.  Have to stop my patchwork and sew this:


I used Lunch Bag Tutorial by Pink Penguin with a different height & width (11"x15" without seam) and I didn't make a rim.  Where we have to fold the bottom corner to form a square, I used 5.5" instead of 5".   I attached cover to the lining before sewing the lining to the outer fabric.

The size is big enough for 3 lunch boxes.   These boxes are free gifts from buying Sensodyne.

I used lighter to treat the end of the webbing so that it won't fray.   I learnt it from:

Materials used:
1) Outer fabric is Linen I bought from http://heart-handy.blogspot.com/search/label/Fabric

2) Lining and cover fabric from Nagoya (I think they are cotton, plain colour, a few ringgit for a meter)

3) Fabric interfacing/stabiliser -  I don't know what we should call them..   It is like this one on Nana Craft Corner but I don't think the one I bought from a nearby shop is cotton and quality is definitely not the same.  They have it in different thickness ranges from 1 meter at RM7 to RM8.5.   I like this more now rather than Kertas Gam (non woven interfacing).  Felt that it will last longer, kain kan...

4) Webbing  - Bought from the same shop I got No 3.  Not very thick and I think it is polypropylene, it is about RM1-2 for a meter.  

Bye now,
Anic

Tuesday, October 26, 2010

Bag Project 4 - Hexagon Patchwork Bag (1)

I have been working on this project for a couple weeks now...    Hexagon patchwork bag...   so much work..   Sewing a little at a time..  sikit sikit lama lama jadi bukit.. :)


The back
 Here are useful tutorial links for hexagon patchwork:
1) http://www.youtube.com/watch?v=FVkV8JBNaIQ
2) http://www.craftstylish.com/item/8335/how-to-english-paper-piecing-project


 The notions I used:

There are 6 needles in this pack.  The thread on the left is Fujix Pice.
I used applique needle by Clover (bought at Craftworld at SS2*) & Fujix Pice thread for piecing.   The needle is quite fine.  I need my thimble to use this needle as even the back of the needle is quite sharp.
The thread is fine and strong specially design for patchwork or applique.   Got it from Nana Craft Corner.   I only bought 1, to me it is quite costly.  :)
I chose a colour which I think should go well with most colours (or I dream it will be that way.. :) )

Note *:  If you buy > RM100 in Craftworld, you could become their member and the next time you buy things from them, you get 10% discount (not on all items).  

Bye now..
Anic

Sunday, October 24, 2010

Sewing Notions 13 - Sewing Machine Pressure/Presser foot


Please meet my new friends..  :)  10 pressure feet for my NV50 which I bought online from China.  The supplier said they were made in Taiwan.   They are at least RM20 each if I buy from the dealer but should be better quality.  These ones, I got them at less than RM90.

Haven't figured out how to use everyone of them (do we really need so many of them? :) )  but I saw another  useful one which I think I should get..  it is the tape binding foot..  looks like it should make bias binding a lot easier...


If you would like to read more about the different feet available, check out:
1) http://www.brother.com/as_oc/hsm/accessory/acc-presser/index.html#general
2)http://sewingmachine221sale.bizland.com/store/page49.html

Good posts about how the to use various feet:
1) http://thesewingcorner.blogspot.com/2011_07_01_archive.html
2) http://sewmamasew.com/blog2/2009/06/feet-feet-feet/

Bye now and regards,
Anic

Friday, October 22, 2010

Undercover Waist Travel Pouch

I made this travel pouch for my mom and thought that some of you may find it useful.   If you haven't seen this before, it is to be worn under your cloths...  so that no pick-pockets will reach it.


        This is another pouch... the internal pocket is added to the bottom layer.  
The notes below add the internal pocket to the top layer.


Some notes to share:
A)  Cut the fabrics as these sizes (seam included).   The size is not nice number as I measured the one I was making which was based on a sample I have..  :)

B) Sew the zip to the fabric,  the sewing zip section of this tutorial is useful...  See how the author close/open the zip to ease the sewing.
C) Sew an extra piece of fabric to No 3 to create internal pockets.  Remember to sew the seam before attaching it.

4) Attached the pockets together.

5) Sew the side bias (I used my 18mm bias tape maker).  Then attached the pockets to the base.  While you sew the sides, attach the buckle and strap.


6) Sew the overall bias..   it is done!

Other than fabric, the following notions are required:

1) Adjustable buckle for one side of the strap (for 2.5 cm tape)  - where to buy?
http://jessvarietybox.blogspot.com/search/label/Hardware%E6%97%A5%E5%9E%8B%E6%89%A3
or check out Haberdashery shop (I found some in the haberdashery shop in PJ old town.)

2) The long strap, you could make it yourself,  I was lazy, so I just bought the 2.5 cm cotton strap from shop.   For making your own, cut a long strap of 2.5" and follow this tutorial.  :)

3) Zips -  I bought zip in meters (1 meter at RM1.5) and add zipper pull myself (each at RM0.2).  Tutorial to thread zipper pull here.

Hope you find this useful and have a good weekend,
Anic

Saturday, October 16, 2010

Envelope Card Holder

I saw this simple envelope card holder in one of the craft forums.   I made one for my blood donation record book (about the size of a credit card):


BTW, there are a lot of advantages donating blood, it actually improves health...  


... Blood donation is an excellent way to get rid of excess iron accumulated in our body due to its overconsumption.  Excess iron in the body can stimulate the formation of free radicals, which are responsible for causing damage to body cells and tissues. Free radicals are also associated with many diseases like heart diseases and cancer. ........ Studies have shown that donating blood regularly can be beneficial for the heart and circulatory system and can reduce the risk of heart diseases, especially among young people.... Besides, blood donation also burns the extra calories and reduces your cholesterol level...  

In addition, you get free medical service from the government if you are donating to Pusat Darah Negara or Government operated medical facilities.   Of course you don't need this if you are already getting free service.  :)

For example:
1 kali ---- Percuma rawatan pesakit luar dan rawatan perubatan (tidak termasuk bayaran X-ray dan pembedahan) dan wad kelas dua untuk tempoh 4 bulan.

2 kali (dalan tempoh 12 bulan)   ---- Percuma suntikan pencegahan Hepatitis B

2 ~ 5 kali  ---- Percuma  rawatan pesakit luar dan rawatan perubatan dan wad kelas dua untuk tempoh 4 bulan.

See more details here:


This card holder is quite simple to make.   Here is the dimension without seam allowance.   


I cut a piece of kain keras as above size.  Then I cut 2 pieces of fabric with same shape but with seam allowance.   I then used iron-on fabric double sided tape to fold the seam nicely for the cover fabric, sewed the printed tapes, then fold the seam for the lining and sticked it to the other side of kain keras again using double sided tape.  :)

Sewed the short straight end and then folded it into envelope shape and sewed the two sides and the triangle side...  then it is done..  :)   No turning and trying to pull fabric & kain keras through a small opening.   

Here is a modified version for my cloth pad: 


Where could you get the iron on double sided tape?  It is especially helpful for sewing a zip.  Stick the zip onto the fabric with this and I could then sew it happily without having to worry about the placement of the zip.  :)


1) Love and Craft Supply - http://loveandcraftsupply.blogspot.com/2010/10/infusible-lining.html
2) May May Shop - http://maymayshop.blogspot.com/2010/09/rmat-22-fabric-iron-on-double-side-tape.html
3) Nana Craft Centre - http://hong2lee.blogspot.com/search/label/Fabric%20Double%20Sided%20Tape
or
4) Emma - Fabric Glue stick (this will fix the fabric temporary and could be washed away, save the hassle of using pin)
http://emma37handmade.blogspot.com/2010/10/blog-post.html


Let me know if you need more photos on the steps to do these.

Have a good weekend,
Anic

Friday, October 15, 2010

Blogger Tips 3 - Cbox Message Box (Reducing SPAM - CAPTCHA)

CAPTCHA is  working... ! I have just enabled it to reduce spam in my CBOX..   :)

=========================================
Belated Selamat Hari Raya Aidil Fitri to Muslim friends..

I am back online..    :)    I found this useful new feature in cbox and would like to share it in case you haven't seen.


Cbox added a new feature called "CAPTCHA" which require users to enter a word according to a randomly generated distorted word image before posting is allowed.

To enable it, go to "Options"->"Posting Options" or simply click setting in the above image.

Then tick the "Require CAPTCHA" box and save the change.

The next time a user post a message, the bellow will be displayed:


Hope you find this useful..

Have nice day...  :)
Anic

p/s:  My other post about reducing spam messages in Cbox - http://anic-lohas.blogspot.com/2010/08/blogger-tips-1-spam-messages-in-cbox.html

Updated:

I tried posting a message with the CAPTCHA enabled and Cbox said "Posting..." but the message didn't appear.  Not sure if this is a temporary problem.   So, try out with your own risk..  :) 

Sunday, October 10, 2010

Cloth Pad Story 2 - Ummi Cloth Pad

I had volunteered myself to test out Ummi Pads by Lynn.   I received the overnight pad more than a month ago..  The pad is very soft and well sewn.  The top is flannel with cute cartoon print as you can see from the above picture and the back is white flannel with pink check print.  It came with 2 sew-on snaps.   Lynn now has a snap press from Tiny Tapir, all her wing pads come with KAM snaps:

I thought it will be comfortable to wear..   but was a bit reserved as it is a bit thick compared to what I have..

I finally got a chance to try it out recently, to my surprise, it is actually very very comfortable despite of the thickness (this is personal view, it may not be thick to others).   No leaking, absorbed well and felt dry too...

My conclusion is this is a very good pad and happy that I owned one...

Lynn,  thanks for making a great pad...

Bye now,
Anic

Saturday, October 9, 2010

Applique Key Pouch

Dear all,

Hope you have a wonderful weekend....

My key chain is really old, so I made myself a key pouch...  :)  It is a design from a book by Shinnie in Taiwan.   I bought the book locally and it is a version published by Publisher in China with the right to publish from Shinnie.  Cheaper....  :)

17cm x 11cm (w x h, includes 1 cm of seam)

Rivet came with the key holder, it was fixed with hammer and the metal piece was also glued 
to the fabric using UHU all purpose adhesive for additional strength.   
This is my own idea.. didn't google what others do.  :) 


Happy that I have a new key pouch but not fully satisfied with the work...  plenty of rooms for improvement..
Compare to the work presented in the book... this is rough.. :)


In case you would also like to make one (not necessary applique version), here are places which sell the key holders:
2)  Heart-handy

The fabric materials were mixed & matched from my fabric stash which took me quite a bit of time & effort.    If you are fancy of making one of these and want an easy way, kit is available from:

It is still time consuming... but at least you don't have to collect the material and buy the book..  :)

Bye now,
Anic

Sunday, October 3, 2010

Bag Project 3 - Linen Cotton & Green Polka Bag

Newly made bag for my mom, hope she likes it...


The pattern is taken from this book I bought from Applemama.  I don't have an exact pattern and tutorial link to share for this one, however the design is almost like the one below except that the it does not use a zip:
http://www.craftster.org/forum/index.php?topic=32204.msg9268#msg9268

Materials used:
1) The linen cotton:
I bought it when she had promotion.   Otherwise, it would be costly as it is imported Japanese Linen Cotton by Lecien Corp.

2) Green polka from May May.

3) Green stripe from Nana Craft Corner - again..  got it when she was giving 20% discount.  :)

4) 8" YKK Zip from Heart Handy

Finally, I am able to sew an even seam... hooray..  :)   See the below picture, there are 3 lines on the pressure foot.  For sewing a 0.7 cm seam, I align the edge of the fabric on the 3rd line. 


It is probably easier if I buy the Seam Guide:
http://www.acesewvac.com/bro-seam-guide.html

Checking out how much it cost...

Bye now,
Anic

Link Within

Related Posts with Thumbnails