Pages

Ladies, if you haven't heard about environmental friendly reusable menstrual products, please read posts on Cloth pads & cups...

Saturday, December 31, 2011

Bag Project 10 - Messenger Bag

Dec sew along project with  Alice Peng.


Don't have tutorial to share for the above...  but found some nice ones online:

1)  Messenger Bag with Zip Top Closure - Heart of Mary


2)  The basic messenger bag by mmmcraft


3)  Mini Fold Over Messenger Bag Tutorial by Ali Foster 


4) Pick a bag pattern!  so many..

5) 45 Awesome free bag making tutorials... 

Happy a good weekend and happy new year...
Anic

Saturday, December 17, 2011

DIY Clothes - Sewing Your Own Panties...1

Yes..  why not..  :)

Here is a very good tutorial showing all the steps required to DIY a panty:
http://comeandseetheseitz.com/2010/03/09/panty-tutorial-how-to-sew-underwear/

However, if you do not want to dissect a nice piece of  panty, you can try to make one by doing the below...  I didn't invent this (I wish I am that clever..:)) ..  I saw this in a forum.

1)  Cut a love shape in a piece of folded paper:

What is this? :)


2)  When you fold it into half, it looks like this:


3) You will need to make adjustment to find the right waist width and the right size of heart shape for the leg holes.


4) Usually the panty has double layer in the middle, you need to make the middle piece by tracing the middle part of this on another piece of paper and cut it out.

Taking a bit of time to get the sizing right..  So,  I sacrifice an old  panty and use the tutorial mentioned above instead.  It gives the exact size I need.. , here is the link again:
http://comeandseetheseitz.com/2010/03/09/panty-tutorial-how-to-sew-underwear/

Most of us probably have many unused/old T-shirts at home... you could try making one using these T-Shirt.

The next thing... I need to learn how to sew or serge stretchy material...  knit, jersey, etc.
1)  Instead of sharp needles, we have to use a ball point needle.  Why?  The ball point needle does not cut the weave of the fabric, it pushes the thread to the side while piercing..   so smart..  Don't try to pock yourself with the ball point needle, though I read that it should be blunt.. but it still look quick sharp!

2)  Here is a long list tips here for sewing stretchy material...   still reading...
http://mirelap.wordpress.com/2008/08/05/tips-for-stretch-fabrics/

Wishing you a wonderful weekend..

Friday, December 2, 2011

Bag Project 9 - Lunch Bag 4

I completed another lunch bag (do I really need another lunch bag? :) ),  homework of a Sew Along group I participated.  The host of the sew along is Taiwanese Author  Alice Peng.  She is author of 2 Mandarin bag making books .   I was able to participate in the sew along due to the effort of Jess See from Potato House, a big thank you to her..


The pattern came from Alice Peng's book.    Due to copyright, I can't share it here.

If you would like to sew one,  try Pink Penguin's lunch bag tutorial.  I have made three other lunch bags based on that.

The curves at the handle were not sewn smoothly.   I didn't clip the curves enough..  :(
These are very nice tutorials about making smooth curves:
   1) http://www.makeit-loveit.com/2010/08/sewing-tips-clipping-corners-and-curves.html
   2) http://wendigratz.blogspot.com/2011/02/tips-and-tricks-for-sewing-curves.html
   3) http://craftapple.wordpress.com/2010/10/05/sewing-tip-sewing-curves/

A good tutorial showing how to sew the drawstring piece:
http://tw.myblog.yahoo.com/nhy678/article?mid=1133

Bye now and have a good weekend,
Anic

Sunday, November 27, 2011

Tissue Paper Holder - very easy to sew it yourself

A very quick project for a friend...  I promised I will sew her a tissue paper holder and it only took me a few months...  She reminded me yesterday, so I spared some very precious time of mine to materialise my promise..  :)   I should be more careful next time not to make promises easily..  :)


Believe me, very simple.  Probably took about 15 mins to make one.

Very purple person shared a nice tutorial:
http://verypurpleperson.com/2010/02/tissue-case-tutorial.html  -  But I have the lining fabric longer than the outer fabric..     The top & bottom are raw edges though which I trimmed them with zigzag scissors.

The below another  one I like.  All edges are hidden in between outer fabric & lining.
http://sewingschool.org/2010/11/14/fabric-tissue-holder-tutorial/

Hope my friend likes it...

Saturday, November 26, 2011

Patchwork wallet give away - WINNER Announcement

The winner is MamaDaniel ! :)  Congratulations!


Thanks to all who have participated...
------------------------------------------------------------------------------------------------------------------------

So long...   I was offline for last 1-2 months...

I am back!!  :)    So much to catch up...    

I am finding a reason to do a give away...  100 followers is a good one.  :)   All followers, please leave a comment if you would like to win this patchwork wallet which I sewed sometime ago in a sew along.    I am also opening this giveaway to PotatoMom Patchwork fb group members.. :)    Entries will be closed by 26th Nov and winner will be announced on 27th Nov.   


Participant List:

1) NoEn - follower (f)
2) MamaDaniel - f
3) Vintage Coconut - f
4) jeslyn - potatomom gp (pg)
5) nur_iza83 (www.4ucutie.blogspot.com) - f
6) Mila@Rimbun - f
7) sunnytan - f
8) Sus@n - pg/f
9) Bnr Craft Street - pg/f
10) May - pg
11) 玻璃瓶子 - pg
12) Vicky - pg/f
13) Nancy Kong - f
14) ScLover - f
15) Rosh -f

Warmest regards,
Anic

Sunday, September 11, 2011

Wallet Project - 8... part 2


How many clips do I need to bind the bias tape?  As many as I have.. :)


A very good post on how to attach the 2 ends of bias tape neatly by Alice Peng :

Another useful post on creating the card compartments quickly by Alice Peng:

Good to use all the clips I have,  this time I only need to sew the bias tape once... .not perfect... but happy with the result.. :)


I should try hard to keep this one for my own use..  :)

Bye, 
Anic

Friday, September 9, 2011

Wallet Project - 8

I have been away past 2 weeks and now that I am back...  I have to sew something..  :)

My work in progress, Wallet cum Passport holder.   The same design as Wallet Project - 6  with another fabric print. The one made earlier has already gone to a friend.


Meet my new friend, the basting-tacking gun (the blue one on the right)..  :)   I don't do big quilting job..  so, have to make good use of all the small opportunities I have..  :)  use the basting gun on a small quilt wallet... LOL.  :)

Learn more about basting gun:
1)  http://www.youtube.com/watch?v=W6_oHLxMGRs  or
without youtube access : http://tw.myblog.yahoo.com/jw!nA5FQ1jCQkNHYwJgqc9F1w--/article?mid=6423&prev=6444&next=6352
2) http://quiltersreview.com/index.php/584/despite-warnings-basting-gun-is-a-hit/
3) http://emma36handmade.blogspot.com/2011/05/blog-post.html  --  This is where I got my basting gun.

Another tool, the plastic pattern sheet on the left.   For pattern which I use a few times, I use plastic sheet so that it is long lasting...  

Something like this, but the one I used is thinner... so cheaper...
http://hong2lee.blogspot.com/2011/09/u121-a4-tracing-plastic-thick.html

Bye now,
Anic

Sunday, August 14, 2011

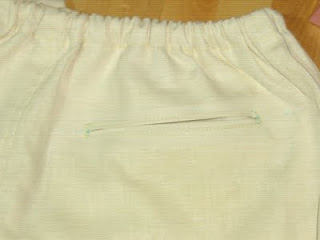
DIY Clothes - Pants (2)

See DIY Clothes - Pants (1)


I am almost done with the pants I am making..     


wanted to add a back welt pocket to the pants which the pattern didn't include and am very happy that I could add one successfully!   Off course, I got all the help I need from googling..  :)
A good tutorial site on how to make the welt pocket:
       http://sewingtutorials.blogspot.com/2008/05/pocket-constructions.html 


I used the third tutorial on this page but the size of welt is not included in the tutorial, however the information is provided in the below discussion:
       http://artisanssquare.com/sg/index.php?topic=5558.0 


I haven't tried creating the pants pattern myself, but if you would like to try, here is a site with tutorial on how to create one:
   http://www.wonderhowto.com/how-to-draft-basic-pant-pattern-0126850/


AND I found free patterns for download here:
   http://www.independentliving.org/fashionfreaks/pattern.html


Here is a free pattern & sewing instruction for a wrap around pants (the Thai style):
   http://www.mediatinker.com/blog/archives/008262.html


Bye now,
Anic

Tuesday, August 9, 2011

DIY Clothes - Pants (1)

What have I been up to?

With lots of encouragement and inspiration from Ayuni, my sewing buddy met in FB, I finally started sewing a pair of pants.. something I wanted to do for a long time.

I bought the patterns from a site recommended by Ayuni:
     www.sewingpatterns.com

They have free patterns there for you to try out if you are not sure.   Below are free patterns:

You need to order the free patterns and they will then send you an email which gives you the instruction of printing the patterns.

I bought pattern Simplicity 5443 and to assemble all the A4 pages to make up the patterns, there were more than 100 pages for this pattern set...  huhu...  so much work..   It has a top, a jacket, a pair of pants, tie & hairband...

A4 papers all over my living area floor:


Even the S size of the pants is too big, so I have follow the ratio of the sizes and scale it down 1 size...

I have the pattern cut, fabric cut and now sewing in progress..... 

Bye now...
Anic

Saturday, July 30, 2011

Sew Along - Patchwork Wallet (Updates from Participants)

All post related to this sew along, here.

How many more steps have we made? :)


Mira Udin's:

This is mine :)


Looking forward to seeing more progress from my other fellow sew along friends:


Mila's week 1 update,  hop over to her blog to find out more:


How about Sue?  :)

Wednesday, July 27, 2011

Brother Sewing Machine NV10 and NV90E on sales...

Price for NV10 is RM899 instead of RM1099, I think this is very good price..   this is now the price across all brother agents...

If you are thinking to buy a sewing machine, you could consider this..

Comparisons among a few brother models:
       http://welcome.brother.com


Price for NV90E is RM1499 instead of RM2999....  This is embroidery machine...  I want one...  :)

Warmest regards,
Anic

Saturday, July 23, 2011

Wallet Project - 7

I made another wallet...  this is the third one in a row...  :)


I like the fabric very much..  They are fabrics of 20*25cm I bought from China website.

Really challenging making this one.  It has 8 card compartments, 2 notes compartments and a zipper pocket for coins:


One useful thing I learnt, Adjustable Zipper Foot is handy in sewing bags, and wallets...  If we use the multipurpose foot, like the below, thick fabric get stuck at the black screw:


But if I use Adjustable Zipper Foot instead... the left side of the foot is clear, so no worries of fabric being stuck with the foot.   This idea came from Taiwanese Patchwork Crafter Alice Peng, who has published a few books.

Image borrowed from Internet


I have made 3 wallets in a row.  Here are the other 2.   I already found 1 owner for the second one below..   Thinking maybe I could organise a swap for the above and the below wallets..  :)


Have a good evening,
Anic

Monday, July 18, 2011

Sew Along - Patchwork Wallet (Week 4)

All post related to this sew along, here.

Week 4 - 25th - 31st July (Putting everything together, Picture 11, 12, 13)

Cut 2 pieces of 9.5 CM (H) * 25 CM (W), add interfacing to 1 piece, wrong side facing each other, sew all around.   This is the back piece for  the  card compartments & zipper pocket.   Sew the pockets to the back piece and add 2.5 CM  (before ironing) bias tape to the top.   


Fabric piece for snap is made from 7.5CM * 5.5 CM.  


How to attach snap here
Attach the snap fabric piece to the outer fabric and attach bias tape of 4CM (width before ironing) all around.


For technique of attaching bias tape, please see tutorials I referred in my past post: No 5 of  http://anic-lohas.blogspot.com/2010/07/wallet-project-part-2-looking-for-tips.html

Yipee...   :)  completed wallet...


Found a way of attaching the 2 ends of bias tape neatly but a bit more work, see step 5 in Google translated tutorial here:

     http://www.sewlover.com/basic/binding/01.html

Happy completing the wallet,
Anic :)

Thursday, July 14, 2011

Sew Along - Patchwork Wallet (Week 1 Updates from Participants)

All post related to this sew along, here.

Where are we now?  :) 


Most of us have completed our outer fabric for the wallet.    It is not late yet if you would like to join us.  :)

Nadia's:


Gee Rms':

SewLove's week 1 update in her blog:


Mila's week 1 update,  hop over to her blog to find out more:


This is mine :)


Sue, don't panic...  take your time... :)


Link Within

Related Posts with Thumbnails