Pages

Ladies, if you haven't heard about environmental friendly reusable menstrual products, please read posts on Cloth pads & cups...
Showing posts with label Sewing Notions. Show all posts

Saturday, March 24, 2012

Sewing Notion 19 - Magnetic Seam Guide


When I sewed a water proof bag sometime ago, I couldn't draw a line easily on the material.   To make sure I sewed an equal allowance straight line, I used the magnetic seam guide (see the gadget circled in red).


A bigger image of it borrowed online

Just attach  the magnetic guide to the metal throat plate on the sewing machine and it will help maintain a uniform seam width while you sew.   It is very convenient but the machine must have surface with steel for it to stick to..   In my NV50, there is barely enough surface for it..   

If you like to know how this is done in action, here is a nice video:

A fb friend suggested DIY using magnetic for Whiteboard...  something to try out. 

I have also seen crafters use  post it note to help:
From http://nicolemdesign.blogspot.com/

An interesting image with all kinds of seam allowance guide:
From http://sewing.about.com
That is all about seam guide.

Before I say bye, here is my naked NV50 while it was being serviced last week.   

It was nerve wracking experience watching my machine being serviced..   I fear that it will actually become worse after the service.   I still haven't do a test run at home...  hoping that it will at least sew like before.

Have a good weekend,
Anic


Friday, September 9, 2011

Wallet Project - 8

I have been away past 2 weeks and now that I am back...  I have to sew something..  :)

My work in progress, Wallet cum Passport holder.   The same design as Wallet Project - 6  with another fabric print. The one made earlier has already gone to a friend.


Meet my new friend, the basting-tacking gun (the blue one on the right)..  :)   I don't do big quilting job..  so, have to make good use of all the small opportunities I have..  :)  use the basting gun on a small quilt wallet... LOL.  :)

Learn more about basting gun:
1)  http://www.youtube.com/watch?v=W6_oHLxMGRs  or
without youtube access : http://tw.myblog.yahoo.com/jw!nA5FQ1jCQkNHYwJgqc9F1w--/article?mid=6423&prev=6444&next=6352
2) http://quiltersreview.com/index.php/584/despite-warnings-basting-gun-is-a-hit/
3) http://emma36handmade.blogspot.com/2011/05/blog-post.html  --  This is where I got my basting gun.

Another tool, the plastic pattern sheet on the left.   For pattern which I use a few times, I use plastic sheet so that it is long lasting...  

Something like this, but the one I used is thinner... so cheaper...
http://hong2lee.blogspot.com/2011/09/u121-a4-tracing-plastic-thick.html

Bye now,
Anic

Thursday, June 9, 2011

Offer Price for Sell In Malaysia Only - Seam Allowance Tool by Hollie

I posted about this tool here.    For us in Malaysia buying it directly from Australia, it would be AUD15 plus AUD3 for shipping, about RM57.

Now it will be yours at RM35 (postage not included) for sell in Malaysia only..  


To order, please email me.   10  0 Unit available....  If there are enough requests, I could arrange for more units.


See how it works here:
http://sew-whats-new.com/video/how-to-use-a-seam-allowance?xg_source=activity

It is very simple to use, image borrowed from Hollie:

Sunday, May 22, 2011

Sewing Notions 17 - Tool to add Seam Allowance to Patterns

How do you add seam allowance to patterns?

I don't have any tool at the moment.. I do it manually... Not very clever...

When searching on internet, I found these ideas:
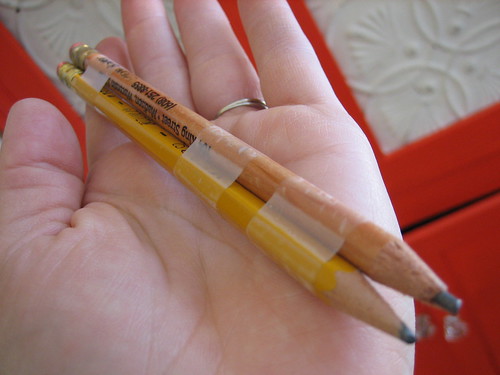
1) Tape 2 pencils together for 1/4" seam allowance! this is so clever..
http://fivegreenacres.wordpress.com/2010/02/16/tools-of-the-trade-add-a-seam-allowance/
Picture from five green acres

You could also pay for something called Seam Tracer which hold 2 pencils together:
http://www.clotilde.com/list.html?criteria=seam+tracer

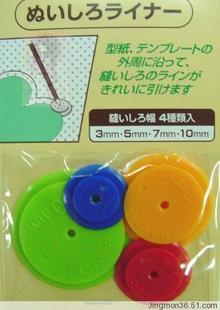
2) Clover
There is also something like these which you could use to add seam allowance.


3) Seam Allowance Guide by Hollie
Adding seam allowance automatically while you cut...
http://sew-whats-new.com/video/how-to-use-a-seam-allowance?xg_source=activity

Anyone interested to get this tool?   It is sold at AUD15 (and add AUD3 for international postage), but if we have 10 people we could get it at better price.   Let me know if you are interested...  
( Please email me (anic dot khow at gmail dot com) if you would like to get one, special price is only for Malaysian customers.)

Sunday, May 15, 2011

Sewing Notions 16 - Picot Foot

I bought a picot foot when I bought my Brother NV50 sewing machine.   Not sure why I bought it at such an early time of my sewing life..  :)


I have been wanting to learn how to use it and finally I managed  to use it 2 days ago to sew a Green bag inspired by Mila.  Will write about the green bag in another post.

What does a Picot Foot do?   It makes a narrow hem with the edge of fabric folded inside.    See the below:

Picture borrowed from Brother website

It is not so easy to use and I found a site which provide excellent information on how to use it:

1)  Learn about the Picot Foot -  http://www.threadsmagazine.com/item/3744/mastering-the-narrow-hemmer-part-one

2) How to sew using Picot Foot (Must read if you are new to Picot Foot and have one.. :) )  - http://www.threadsmagazine.com/item/3947/mastering-the-narrow-hemmer-part-two/page/all

--  Another way: http://www.berninausa.com/webautor-data/401/hemmer-feet-64-video.wmv
Sew a few stitches at the beginning without folding, and then use the thread to guide the fabric through the curl of the foot.

3) Additional techniques (corners, crossing over seam, etc) - http://www.threadsmagazine.com/item/3948/mastering-the-narrow-hemmer-part-three

Hope this help...

Bye,
Anic

Saturday, May 14, 2011

Sewing Notions 15 - Rivet

I forgot to add button loop (or magnetic button) to the bag I made recently before I completed the sewing..

Have to add later and the material is too thick to sew a loop on the bag.


So, I used rivet instead..  so handy...  :)


Here is how to attached rivet:
1) http://www.howtohistory.com/2010/06/how-to-set-a-double-cap-or-jiffy-rivet/
2) http://sew4home.com/tips-resources/sewing-tips-tricks/635-how-to-attach-metal-rivets-on-sewing-projects

I bought mine rivet set from China online website but here is where to buy rivet tool locally:
1)  http://hong2lee.blogspot.com/2011/04/o28-o29-o30-tubular-rivet-tool.html - this does not include a base which I think it is fine, use some old newspaper and scrap as base...  try at your own risk.  :)

2)  http://sewinglife-shop.blogspot.com/2011/04/8mm-rivet-tools.html - this one come with a base

3) http://sewinglife-shop.blogspot.com/2011/04/rivet.html - revets,  look at the diameter of the rivet for the width of the handles and the length of the rivet (must be sufficient for the thickness of handle material & bag).

4) http://craftybuddy.blogspot.com/search/label/Rivet%20Button%20%E6%9F%B3%E9%92%89 - rivets

5) http://www.zilakasim.com/beg/stock-clearance-part-1/

Have a good weekend,
Anic

Tuesday, May 3, 2011

Sew Along - MyBotang Appliqué Project..4

Finally...   I completed the sewing...   I didn't use a black colour thread for the flowers as I didn't think that it will go well with the dark background.    But the yellow thread I used didn't show very well with the light colours flowers..  I should have used a slightly darker colour for the white flowers.  Oh well, I used a thicker thread (the shop person said it is for sewing jeans) and I am only willing to buy 2-3 spools.  I bought yellow because I like the Sun Flower as it is and didn't want my potential bad sewing to ruin it.   :)

Now, I just need to turn it into a bag.   :)


Some notes:
1)  My machine was skipping stitches..   and finally figured that I need to change my needle. Replacing the needle solved the problem.

Read more here for potential reasons why the machine may skip stitches:
http://www.pfaffmachines.co.uk/faq/sewing-machine-missing-skipping-stitches/

Another useful post on what to do when machine is not stitching properly:
http://www.fabrics.net/sarahmachinerepair.asp

2) Thread
I was trying to learn more about thread and found these links useful:


a) Sewing with the right thread - gives an overview of different type of threads available:


b) This link has microscope view of various quality thread.    The low quality ones, the thread has lots of loose fibers:
http://sewing.about.com/library/weekly/aa102100a.htm

When I bought my sewing machine, the shop person said I should use good thread and they recommended Dolphin - buatan Malaysia (what they sold in the the shop).  I have never looked at what it is... until this morning..  lol.  The label said polyester and  "D" and a number  on the spool.  I guess the number is the colour number system of Dolphin.    What thread do you use?


Check out the various type of threads available on this site just for our knowledge.   Luckily I didn't know there are so many choices, otherwise, I would be so confused to start with so many..  :)
http://www.sewessential.co.uk/CategoryTree.asp?CategoryID=637

This one is interesting..  -  Water Soluble thread! http://www.sewessential.co.uk/Category.asp?CategoryID=1339&NumPerPage=5&page=1   It is for basting...  but if you use it accidentally to sew cloth...  the cloth will fall apart while you wash it..  :)

Bye now,
Anic

Sunday, April 17, 2011

Sewing Notions 14 - Scissors

The recent Sew Along - Mybotang Applique Project has inspired me to look at scissors.

I was using a big pair of scissors, the usual pair of scissors I used for cutting fabric, it was difficult for cutting small applique...  and my hand was painful..  :(

What scissors do you have?   Any recommendation of getting good and economy fabric scissors in Malaysia?

I started reading about scissors online and coincidentally, Applemama had bought Fiskars scissors from the US.

I asked my good friend "Google" and found some good reviews about Fiskars softouch scissors:
   1) http://www.quiltersreview.com/article.asp?article=/review/product/001225_a.asp
   2) http://www.epinions.com/review/Fiskars_Brands_Soft_Touch_Scissors/content_412426473092  

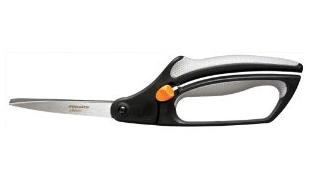
It uses a spring to automatically open the scissors and we just need to close our hand to cut.   It has ergonomic handles with soft rubber which cushion the grip.  Sound really comfortable to use.

But, where to buy locally?   I heard they are expensive here..  :(  

They are a lot cheaper in Joann.   Need to get a friend to buy...  :)
1) http://www.joann.com/joann/catalog/productdetail.jsp?CATID=cat3504&PRODID=prd38123
2) http://www.joann.com/joann/catalog/productdetail.jsp?CATID=cat3504&PRODID=prd38122 - apparently this is about RM150 here and it is about USD15 now in Joann.

If you are buying from Joann, check out coupon code to use here:
  http://www.retailmenot.com/view/joann.com

Other than Fiskars, there are also Kai & Gingher, someone was asking which is the best brand:
  http://answers.yahoo.com/question/index?qid=20081010023429AAGxxqo

Here is a link which provide good overview of different grades of Scissors & maintenance etc:
  http://www.jaeberly.com/id50.html

Another article with lots of information about scissors (how to select your scissors?)
  http://hubpages.com/hub/Sewing-Scissors-Scissors-Basics-for-Every-Sewing-Task


Interesting discussions about scissors:
  http://www.thriftyfun.com/tf97251558.tip.html

Tuesday, October 26, 2010

Bag Project 4 - Hexagon Patchwork Bag (1)

I have been working on this project for a couple weeks now...    Hexagon patchwork bag...   so much work..   Sewing a little at a time..  sikit sikit lama lama jadi bukit.. :)


The back
 Here are useful tutorial links for hexagon patchwork:
1) http://www.youtube.com/watch?v=FVkV8JBNaIQ
2) http://www.craftstylish.com/item/8335/how-to-english-paper-piecing-project


 The notions I used:

There are 6 needles in this pack.  The thread on the left is Fujix Pice.
I used applique needle by Clover (bought at Craftworld at SS2*) & Fujix Pice thread for piecing.   The needle is quite fine.  I need my thimble to use this needle as even the back of the needle is quite sharp.
The thread is fine and strong specially design for patchwork or applique.   Got it from Nana Craft Corner.   I only bought 1, to me it is quite costly.  :)
I chose a colour which I think should go well with most colours (or I dream it will be that way.. :) )

Note *:  If you buy > RM100 in Craftworld, you could become their member and the next time you buy things from them, you get 10% discount (not on all items).  

Bye now..
Anic

Sunday, October 24, 2010

Sewing Notions 13 - Sewing Machine Pressure/Presser foot


Please meet my new friends..  :)  10 pressure feet for my NV50 which I bought online from China.  The supplier said they were made in Taiwan.   They are at least RM20 each if I buy from the dealer but should be better quality.  These ones, I got them at less than RM90.

Haven't figured out how to use everyone of them (do we really need so many of them? :) )  but I saw another  useful one which I think I should get..  it is the tape binding foot..  looks like it should make bias binding a lot easier...


If you would like to read more about the different feet available, check out:
1) http://www.brother.com/as_oc/hsm/accessory/acc-presser/index.html#general
2)http://sewingmachine221sale.bizland.com/store/page49.html

Good posts about how the to use various feet:
1) http://thesewingcorner.blogspot.com/2011_07_01_archive.html
2) http://sewmamasew.com/blog2/2009/06/feet-feet-feet/

Bye now and regards,
Anic

Saturday, October 16, 2010

Envelope Card Holder

I saw this simple envelope card holder in one of the craft forums.   I made one for my blood donation record book (about the size of a credit card):


BTW, there are a lot of advantages donating blood, it actually improves health...  


... Blood donation is an excellent way to get rid of excess iron accumulated in our body due to its overconsumption.  Excess iron in the body can stimulate the formation of free radicals, which are responsible for causing damage to body cells and tissues. Free radicals are also associated with many diseases like heart diseases and cancer. ........ Studies have shown that donating blood regularly can be beneficial for the heart and circulatory system and can reduce the risk of heart diseases, especially among young people.... Besides, blood donation also burns the extra calories and reduces your cholesterol level...  

In addition, you get free medical service from the government if you are donating to Pusat Darah Negara or Government operated medical facilities.   Of course you don't need this if you are already getting free service.  :)

For example:
1 kali ---- Percuma rawatan pesakit luar dan rawatan perubatan (tidak termasuk bayaran X-ray dan pembedahan) dan wad kelas dua untuk tempoh 4 bulan.

2 kali (dalan tempoh 12 bulan)   ---- Percuma suntikan pencegahan Hepatitis B

2 ~ 5 kali  ---- Percuma  rawatan pesakit luar dan rawatan perubatan dan wad kelas dua untuk tempoh 4 bulan.

See more details here:


This card holder is quite simple to make.   Here is the dimension without seam allowance.   


I cut a piece of kain keras as above size.  Then I cut 2 pieces of fabric with same shape but with seam allowance.   I then used iron-on fabric double sided tape to fold the seam nicely for the cover fabric, sewed the printed tapes, then fold the seam for the lining and sticked it to the other side of kain keras again using double sided tape.  :)

Sewed the short straight end and then folded it into envelope shape and sewed the two sides and the triangle side...  then it is done..  :)   No turning and trying to pull fabric & kain keras through a small opening.   

Here is a modified version for my cloth pad: 


Where could you get the iron on double sided tape?  It is especially helpful for sewing a zip.  Stick the zip onto the fabric with this and I could then sew it happily without having to worry about the placement of the zip.  :)


1) Love and Craft Supply - http://loveandcraftsupply.blogspot.com/2010/10/infusible-lining.html
2) May May Shop - http://maymayshop.blogspot.com/2010/09/rmat-22-fabric-iron-on-double-side-tape.html
3) Nana Craft Centre - http://hong2lee.blogspot.com/search/label/Fabric%20Double%20Sided%20Tape
or
4) Emma - Fabric Glue stick (this will fix the fabric temporary and could be washed away, save the hassle of using pin)
http://emma37handmade.blogspot.com/2010/10/blog-post.html


Let me know if you need more photos on the steps to do these.

Have a good weekend,
Anic

Saturday, September 25, 2010

Sewing Notions 12 - Bobbins

My brother machine NV50 came with 3 bobbins.   This is of course inconvenient as we are likely to use more than  3 colours of threads.  However, being cost conscious, I didn't buy more bobbins from the original seller of the machine thinking that I could buy them from other places at cheaper price.   I ended buying 3 wrong types of bobbins.  :(   Looks like I am penny wise and pound foolish...

I was annoyed by this, so I did some research on this:
1) Found a list of different type of bobbins in the following link..   didn't realise there are so many different types:

Brother NV 50 uses SA156 (Class 15 plastic).  Does anyone know if NV50 uses the metal version of class 15 ok?

Even for Brother's machines, there are different types of Bobbins:

2)  Here is a good guide on how to thread the bobbin correctly for top loading:

(A picture of thread not inserted correctly through tension adjusting spring)

While looking, I found this useful Brother website with Manuals & troubleshooting information.   Though I have the hardcopy of the manual, it is easier sometime referring it online:

Recording my findings for my own convenience and sharing them with you....

Wednesday, September 22, 2010

Sewing Notions 11 - Kam Snaps & Cloth Pads

I sewed 5 cloth pads last weekend so that I could use my new Kam snap pliers..  :)    I have friends in mind who I can give them too.  


These are panty liners, the left 2 are tops with flannels and the right most with designer cotton.  :)   The backing is microfleece like below right. 

Normal flow day pads with Zorb as core and the top is from suede cloth.   The backings were made from pink colour Sandwich PUL (as above left) and I have a feeling that these pads may make the users sweat.
(These snaps are size 20.)


There are 4 parts in one complete set of Snap:


What do we do with the parts?   You need to poke a hole in the fabric, and then put the stud or socket on top of the cap, like this:

Then centre everything nicely on the pliers and close the pliers and press.
hooray..  the snap is fixed onto the fabric.   The centre sharp bit of the cap will become flatten like this:


I have borrowed Serena's & another blogger's pictures.  I tried to take photos of my own but I don't know how to take good close up views.

My pliers will apply snaps for size 20 (12.4mm), 16 (10.7 mm), 14 (9.74 mm) & 24 (bigger than 12.4mm, don't know the diameter).

I bought 200 sets of snaps of size 16 but found them a bit too small for normal size cloth pads.  200 sets will give 400 caps, 200 studs & 200 sockets.

Generally, I read that size 16 is recommended for cloth pads, and size 20 for diapers.   But size 20 is really not that big, I suggest you go for size 20, good all rounder.   Size 16 looks a bit small on normal size cloth pads.  They are ok for panty liners.

Originally, I wanted to buy a mixture of size 16 & size 20 of 200 sets from the seller, but she wasn't able to do the mix, however she was kind enough to give me some samples of size 14 & size 20.   Size 14 & 16 use the same studs & sockets, only the caps are smaller for size 14.

For cloth pads tutorials - please see:
http://anic-lohas.blogspot.com/2010/07/diy-cloth-pad-part-3.html

Hope this help.

Bye now..
Anic

Monday, September 20, 2010

Sewing Notions 10 - Kam Snap Pliers (From Tiny Tapir)

Hi everybody....

Great news, Tiny Tapir now sells Kam Snap Pliers...   Cheaper than the one I bought.  RM39.90...   

Check out their website:

http://www.tinytapir.com/item/KAM-Plastic-Snap-Pliers-DK001/1536/c130

Saturday, September 18, 2010

Sewing Notions 9 - Kam Snap Pliers

Dear all,

Finally after many days of waiting, today I managed to collect my Kam snap pliers from the post office.    I bought it from Serena of Notion Supply Yahoo Group.   The standard set without snaps is USD20 including postage which allow you to apply Kam snaps of size 16, 20, 24 (I added USD1 to get the snap die for size 14).  I also bought 200 snaps of 8 colours at USD10.   You could also buy the snaps from www.tinytapir.com.

Updated 20 Sept: Please note that Tiny Tapir now sells Snap Pliers at RM39.9 per set.


I couldn't wait and tested the pliers with the cloth pads I have sewn.   It works!   :)  Very please that I can now apply resin snaps on the many cloth pads I am going to sew.


To get more information on buying the pliers, join the Notion Supply group, you will then be able to access all the information there...

Bye now,
Anic

Wednesday, August 18, 2010

Sewing Notions 8 - DIY Thread Bobbin Card


My newly made bobbin cards..  made from old business cards I collected from friends for recycling purposes.  :) 

I bought some embroidery thread from feltralicious sometime back.   After I cut the length I need, there are 6 strands and I normally use a few strands and there is always some left.  I wanted to store them neatly and saw this nice printable bobbin card by Wild Olive:
http://wildolive.blogspot.com/2009/11/printable-thread-bobbins.html

I found the link through:
http://freebiesforcrafters.blogspot.com:   

(Thank you for sharing this)

I printed out the pdf file, simply cut and glued them to the old business cards to increase the thickness.   I then cut out each bobbin.  The bobbin cards are cute and easy to make..  and cost almost nothing..  :)

Similar formula for storing the laces & ribbon.. recycling cardboard...

Wednesday, August 11, 2010

Sewing Notions 7 - My First Fabric Button


With little time I have tonight, this is what I could do..  :)   my first fabric button..  :)   It is from linen scrap I bought from MyBotang.     The button is not in perfect round, because the fabric was not big enough to be pulled to the centre properly.    I didn't use a kit.

Here is a link to a tutorial which use a cover button without a kit:
http://www.craftpudding.com/2007/06/covered-button-tutorial.html

This one doesn't even need a cover button, just use something round:
http://www.cutoutandkeep.net/projects/diy_fabric_buttons

Thanks to the link owners for sharing the tutorial.


Where to get cover buttons, please see my previous post:
http://anic-lohas.blogspot.com/2010/08/craft-coop-coverfabric-buttons-tool-kit.html

Link Within

Related Posts with Thumbnails